


Make your maps look awesome on Bubble + prevent user text selection

In today’s issue:
How to make your maps look great
Stop the user from selecting and copying text from your page
bubbleHacker of the week: Ankur Khandelwal
How to make your maps look great on Bubble

When working with maps, especially on mobile, we want to provide a great UI. Below are a few quick tips on how you can make your maps stand out:
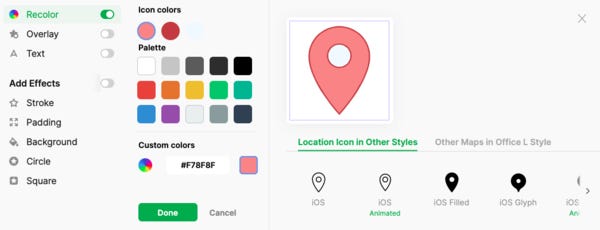
Use custom markers
Custom markers look so much better. There are many great sites where you can get custom markers - for example, icons8.com (not affiliated).
Find one you like
Recolor and use an outline. The outline makes sure the icons look nice if many icons overlap on a map.
Download (go for something around 40px in size) and add to your Map on Bubble.
Don’t forget to check the license requirements and attribute if needed.
Building for mobile? Hide the clutter
Google’s default terrain and zoom buttons can make your UI look cluttered. Want to get rid of it? Add an HTML element to your page and add the following CSS code:
<style>
.gmnoprint, .gm-fullscreen-control, .gm-style-cc{
display: none !important;
}
</style>

Use a different map style
Play around with the different map styles available in the element inspector.

See my example implementation here.
Prevent the user from selecting and copying text from your page
Ever wanted to stop the user from selecting and copying text from your website? This is often also a great hack to improve your mobile UX. Here are two ways you can do so:
Disable for the whole page
Add an HTML element to your page and add the following code:
<style>
body {
-webkit-touch-callout: none; /* iOS Safari */
-webkit-user-select: none; /* Safari */
-khtml-user-select: none; /* Konqueror HTML */
-moz-user-select: none; /* Old versions of Firefox */
-ms-user-select: none; /* Internet Explorer/Edge */
user-select: none; /* Non-prefixed version, currently
supported by Chrome, Edge, Opera and Firefox */
}
</style>
Disable for a specific element
Add an HTML element to your page and add the following code:
<style>
.noselect {
-webkit-touch-callout: none; /* iOS Safari */
-webkit-user-select: none; /* Safari */
-khtml-user-select: none; /* Konqueror HTML */
-moz-user-select: none; /* Old versions of Firefox */
-ms-user-select: none; /* Internet Explorer/Edge */
user-select: none; /* Non-prefixed version, currently
supported by Chrome, Edge, Opera and Firefox */
}
</style>
Then do the following:
Install the Classify Bubble Plugin
Check “Expose the option to add an ID attribute to HTML elements” in settings/general.
On the elements for which you want to apply the noselect class, add the following code in the ID attribute field:
{addClass: "noselect"}
See example implementation here.
⚠️ However, please be aware that it is still possible to extract your text from the page’s HTML code, eg. using Chrome’s Dev Tools.
bubbleHacker of the week: Ankur Khandelwal
https://twitter.com/ankur_khandlwal
Who are you?
I am Ankur Khandelwal (aka NoCodeTalks), I love building products. At day, I run a Tech Hiring Company, and at night, I create content or build products using No-code tools.
What are you building?
I am currently building a Bubble plugin development course, especially for Bubble devs who want to start their Plugin Development Journey. While building a product using the Bubble, I realized there is no proper documentation available for creating Bubble plugins. There are also many myths around plugin development like you need a programming background to build one, it’s super hard, and many more. So to break them all, I prepared this course.
What is your most significant learning from this project?
1. Always use tested tools.
2. Keep your moving part at a minimum so that you can focus on the main part (i.e. content in my case)
What is your favourite Bubble hack?
To see how an open-source Bubble plugin is built- or see the plugin code, - Go to plugin page and click the “See Plugin Code” button.
Next up: All you ever wanted to know about native wrapping
Just a little heads up: In the next couple of issues I will explore ways to launch your Bubble apps in the Apple App Store or Google Play Store using different native wrapping approaches. Stay tuned :)
Join the discussion
Do you want me to write about a specific topic, or do you have an awesome Bubble hack you would like to share? I’d love to hear from you, and I’m looking forward to engaging in the Bubble forum or on Twitter.
Also, if you like this newsletter, why not forward it to a friend :)
See you soon,
Damian